Social Media Safe Areas in DaVinci Resolve: A Practical 9:16 Ad Workflow
Build a reliable 9:16 safe-area workflow in DaVinci Resolve, reframe landscape footage, and deliver ad variants without hiding the message behind platform UI.
How do you keep important content visible in a 9:16 social ad?
Keep the subject, logo, offer, and call to action inside a conservative central area of the 1080x1920 frame, then review the finished export with the destination app's interface over it. DaVinci Resolve can show guides and overlays, but no single guide is a permanent guarantee for every TikTok, Instagram Reels, or YouTube Shorts layout. Treat safe areas as a design system you test, not a box you blindly trust.
The most dependable workflow is to create one vertical timeline, place a semi-transparent guide above the edit, reframe the footage around the guide, and disable or remove the guide before export. If you want to generate the first vertical crop faster, Cutsio's Reframe tool converts landscape footage into 9:16, 1:1, 4:5, or 2:3 versions in the browser. You can then bring the result into Resolve for typography, audio, color, and final safe-area checks.
What do “safe areas” mean for vertical video?
Safe areas are regions where essential information is unlikely to be covered by app controls, captions, usernames, or descriptions. They are different from the edge of the video: the full 1080x1920 canvas is exportable, but the edges are not equally reliable for text and branding.
Use three zones when designing a 9:16 ad:
| Zone | Use it for | Editing rule |
|---|---|---|
| Action zone | Faces, products, demonstrations, and movement | Keep the important action visible, but allow it to move when the story requires it. |
| Message zone | Headline, price, subtitle, logo, and CTA | Keep text comfortably inside the central area with generous padding. |
| Interface risk zone | Lower description area, side controls, and top account area | Avoid essential information; background imagery can extend here. |
The exact risk zone changes with the platform, account type, placement, language, and app update. A guide should therefore communicate risk, not pretend to predict the UI to the pixel.
What should a 9:16 safe-area diagram look like?
The diagram below is a practical starting point for a 1080x1920 ad. It is intentionally conservative: use the middle area for information and reserve the edges for imagery that can be covered without damaging the message.
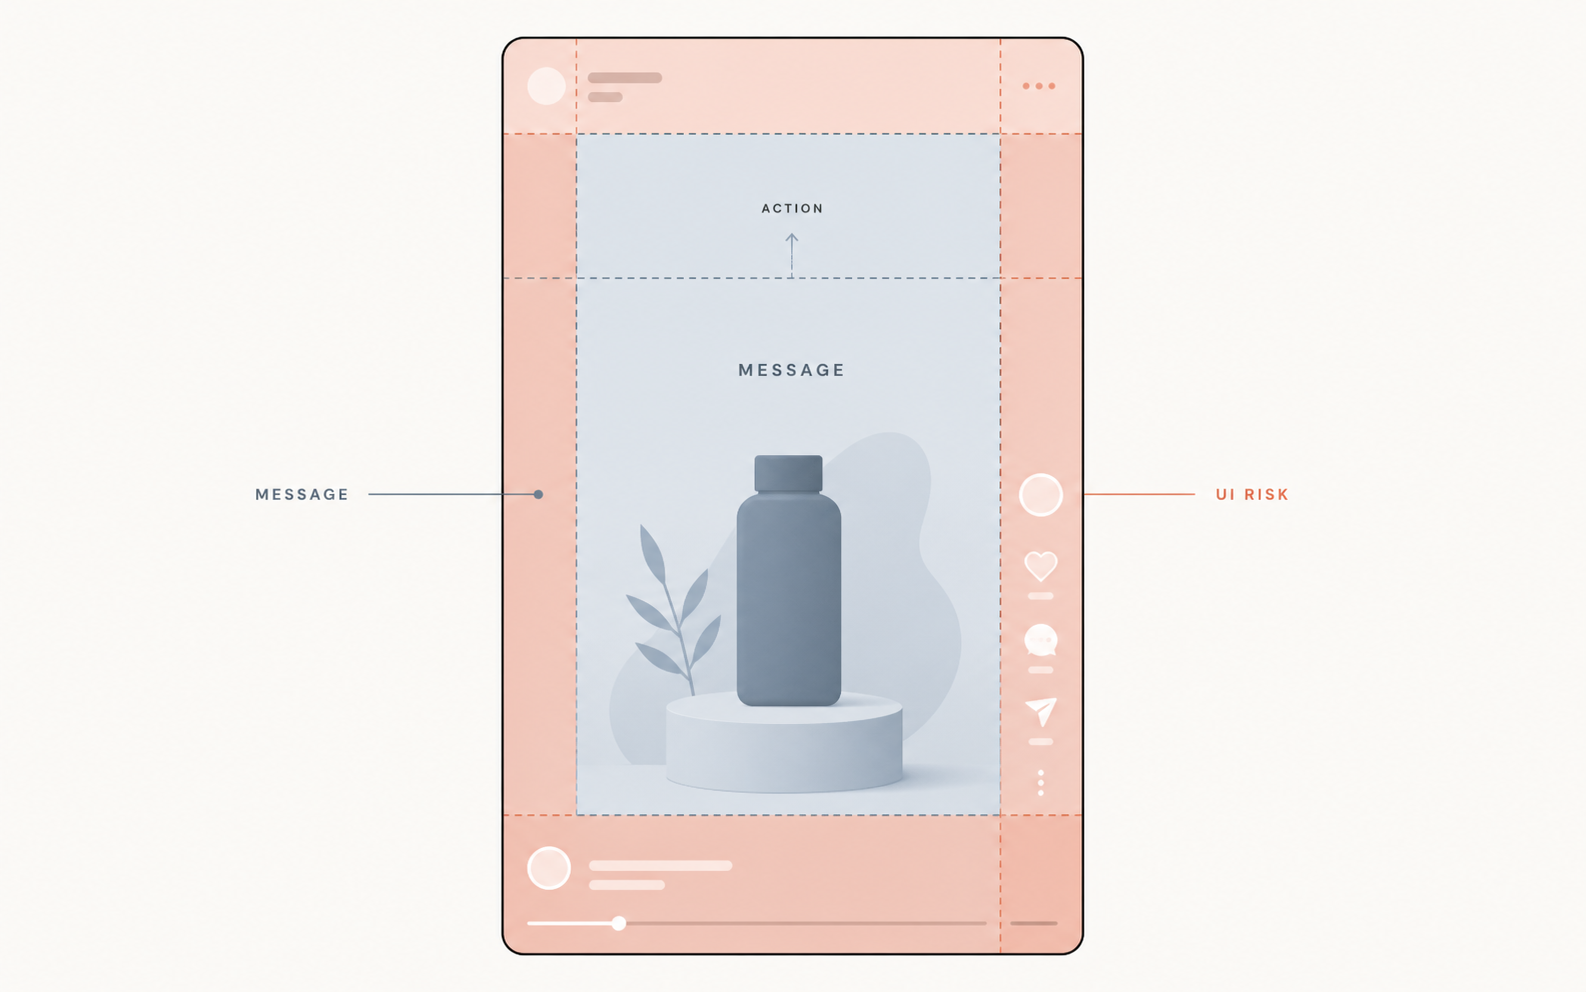
1080 px wide
┌─────────────────────────┐
│       TOP RISK           │  account / audio / platform UI
│   background is fine     │
│ ┌─────────────────────┐ │
│ │                     │ │
│ │    ACTION +         │ │
│ │    MESSAGE ZONE     │ │  face, product, headline, offer
│ │    keep readable    │ │
│ │                     │ │
│ └─────────────────────┘ │
│                         │
│  SIDE RISK       SIDE RISK│  buttons and edge cropping
│                         │
│       LOWER RISK         │  caption / description / CTA UI
└─────────────────────────┘
1920 px high
For a real campaign, make a separate guide for each placement your media buyer is using. Keep a version number and date on the guide, for example vertical-safe-guide-v2, so an editor can tell which assumptions were used for each batch.
How do you set up a vertical timeline in DaVinci Resolve?
Set the timeline to a vertical 1080x1920 format before reframing clips or placing text. This makes the viewer, title-safe decisions, and final export agree with one another.
- Open Project Settings and locate the master or timeline resolution settings.
- Set the timeline resolution to 1080 x 1920 and confirm the project frame rate before editing.
- Create a dedicated timeline for the vertical variant rather than changing the resolution of the landscape master.
- Add your safe-area PNG or guide graphic on a top video track.
- Lower the guide's opacity so you can see the footage underneath it.
- Lock the guide track to prevent accidental movement or trimming.
The guide is an editorial aid. Before rendering, disable its visibility or remove the track, then inspect the final file to confirm that no guide pixels were exported.
How do you make a custom safe-area guide?
Create a transparent 1080x1920 PNG with shaded risk zones, a clearly marked central message zone, and small labels outside the intended delivery area. A custom guide is usually more useful than a generic overlay because it can match the campaign's typography, caption style, and placement.
Keep the guide simple. Use a thin border for the preferred region, a light translucent fill for risky regions, and avoid bright colors that make it difficult to judge skin tones or product color. Do not bake the guide into the source footage or a client-facing preview.
If several editors use the same template, store the guide with the project assets and document the following:
- canvas size and frame rate;
- placement or platform assumption;
- minimum text padding;
- caption and logo positions;
- guide version and review date.
How do you reframe 16:9 footage into a 9:16 ad?
Reframe the story one shot at a time. Start with the crop that keeps the action understandable, then adjust the focal point and graphics rather than forcing every landscape shot into the same center crop.
For a simple shot, select the clip and use the Inspector's transform controls to adjust zoom and position. For a moving subject, keyframe the horizontal position so the face, product, or speaker remains in the action zone. Check the first and last frames of every shot; a crop that looks correct at the beginning can drift off the subject by the end.
DaVinci Resolve Studio includes automated reframing tools, but automation is a first pass rather than a final decision. Review shots with two people, objects entering from the side, hands demonstrating a product, and scenes with text baked into the original landscape composition. Those are common failure cases for an otherwise convincing automatic crop.
How should you place text and calls to action?
Place the headline where it can be read without competing with the face or product, and keep the CTA separate from the platform's likely lower interface. Use fewer words, larger type, stronger contrast, and enough time on screen for a viewer to understand the offer without pausing.
Before duplicating the variant, check:
- Is the first-frame hook visible without the app UI?
- Can the product be identified on a small phone screen?
- Is the logo clear without being the largest element?
- Does the CTA remain readable if the lower portion is covered?
- Are captions inside the message zone and away from the ad's own CTA?
Do not solve a safe-area problem by shrinking everything. Tiny text technically fits but still fails in a fast-scrolling feed.
How do you create multiple ad variants without losing control?
Create one approved vertical template, then vary one controlled element at a time: hook, opening shot, offer, caption treatment, or CTA. Name timelines and exports consistently so performance data can be mapped back to the edit.
| Variant | Change | Keep constant |
|---|---|---|
| A | Opening hook | Product shot, offer, CTA, safe guide |
| B | First three seconds | Offer, music, caption style |
| C | CTA wording | Hook, crop, typography |
Use names such as campaign_product_916_hook-a_v03. Avoid filenames like final-final-2, which make revision and reporting harder. Upload the source footage to Cutsio when you need to search across interviews, demos, or long recordings for the right moments before assembling these variants in Resolve. Cutsio's Visual Intelligence analyzes the visual content of every frame alongside audio, creating a unified search index for any moment.
How do you QA a 9:16 export before publishing?
Watch the rendered file on a phone-sized viewport and verify the actual platform placement before spending media budget. The timeline viewer is useful for editing, but it cannot reproduce every current interface state.
Use this short review:
- Confirm the export is 1080x1920 and the intended frame rate.
- Check the first three seconds with sound off and captions on.
- Inspect every cut for a subject or product leaving the crop.
- Test the text against a light and dark background.
- Preview the file in the target placement, including the platform controls.
- Confirm the guide, labels, and extra tracks are not present in the export.
Can Cutsio help before the DaVinci Resolve edit?
Yes. There are two useful entry points. Cutsio Reframe is the quick path when you already have a finished landscape video and need a vertical crop. Cutsio's searchable workspace is the better path when you first need to find moments in long-form footage, such as a product demonstration, presenter answer, or reaction shot, before assembling variants in Resolve.
For example, search for a product demonstration, a close-up of a specific feature, or the moment a presenter says the offer. Or upload a finished 16:9 ad to Cutsio Reframe, choose 9:16, and use the generated version as your starting point. Then use Resolve for precise crop adjustments, typography, color, audio mix, and platform-specific finishing. This division keeps discovery and reframing fast without pretending that automation replaces editorial judgment.
FAQ
What is the standard 9:16 resolution for TikTok, Reels, and Shorts?
The standard vertical canvas is 1080x1920 pixels. Confirm the current delivery specification for a paid campaign before exporting a large batch. If an export needs a different size, Cutsio's free Video Resizer scales it to 1080p, 720p, 480p, or 360p in your browser.
Does DaVinci Resolve have one exact safe-area overlay for every social platform?
No. Resolve can display guides and imported overlays, but platform interfaces and placements vary. Use a dated custom guide and validate the finished export in the target placement.
Should the safe-area guide be visible in the final export?
No. The guide is for editing and review only. Disable or remove it before rendering, then check the exported file.
Is automated Smart Reframe enough for an ad variant?
No. It can accelerate the first pass, but manually review faces, two-person shots, product demonstrations, and any source graphics near the crop.
What is the fastest reliable workflow?
Find the strongest moments, create a 1080x1920 timeline, use a versioned guide, reframe shot by shot, vary one ad element at a time, and QA the rendered file in the destination placement.
Related reads
- DaVinci Resolve Scripting: Automation Workflows for Repetitive Social Media Versioning — Learn how to automate repetitive DaVinci Resolve social-media versions with scripting, structured inputs, render queues, and a review workflow for approvals.
- Adaptive Subtitle Line Breaks for Short-Form Video in DaVinci Resolve 20 — Master the DaVinci Resolve 20 subtitle engine. Learn how to configure adaptive line breaks and styling for high-retention YouTube Shorts and TikToks.
- Why Won't My XML Import into DaVinci Resolve? 9 Fixes — Fix XML imports that fail in DaVinci Resolve by checking format, source media, timecode, frame rate, effects, paths, and relinking.